
How to build CI/CD pipelines on Kubernetes
Kubernetes as a standard development platform
We started with single, often powerful, machines that hosted many applications. Soon after came virtualization, which didn’t actually change a lot from a development perspective but it did for the field of operations. So developers became mad, and that’s when the public cloud emerged to satisfy their needs instead of operations guys’. Now, this pendulum has moved once again and we have something that is beneficial for both sides - Kubernetes platform. I keep saying and will repeat it here again - I think it’s one of the best projects that have emerged in the last decade. It has completely changed the perspective of how we deliver applications and also how we manage platforms for them. This time I want to focus on the delivery process and how it can be built and what the real benefits of using Kubernetes for that purpose are.
How CI/CD is different in Kubernetes
There are a couple of differences that actually are results of its design and usage of containers in general.
Everything is distributed
Kubernetes was built to satisfy the growing requirements of applications that run on a larger scale than ever before. Therefore applications can run on any node in a cluster and although you can control it, you shouldn’t unless you really have to. Nodes can also be distributed among different availability zones and you should actually treat them in the same way as containers - they are ephemeral and disposable.
Applications and services are delivered in immutable container images
No more quick changes or hotfixes applied to live (sometimes even production) environments. That’s something that many people cannot comprehend and is sometimes frustrating. In order to change something now, you need to build a new version of an application (the harder part) or change something within your environment (the easier part - e.g. changing firewall rules with NetworkPolicy, changing a configuration with ConfigMap etc.).
Changes in application environments are controlled with yaml files
From the platform management perspective, this is a huge improvement. Since Kubernetes is a declarative system, every change can be described as a set of yaml files. It can be intimidating at first but brings stability, predictability, and security to the whole process.
Everything as code
I guess this just sums up the previous points. When you maintain an environment for your applications you actually need to manage changes through files that you version, test and improve with great care. It can also involve every part of your environment starting from infrastructure (e.g. cloud or on-premise hardware) through Kubernetes cluster(s) and ending with environments containing your applications.
How can you improve your delivery process with Kubernetes features
Maybe you already have existing environments with nice CI/CD pipelines and you may wonder what are the real benefits of using Kubernetes for your applications. I personally see a lot of them and let’s go through the most important ones.
Increased transparency and trackability of changes
Has someone ever made an unpleasant surprise on your test or staging environment? I’m pretty sure it was made with good intentions, but often these unexpected changes lead to unnecessary hours of troubleshooting and frustration. With everything kept in yaml files and maintained as code in versioned git repositories with all good practices around it (i.e. code review, tests) these kinds of surprises should not happen. With the well-designed delivery process, all changes are trackable and no manual action performed outside of the standard process could affect working applications.
Test environments available rapidly, on-demand and in large quantities
Whenever there’s a need for a new environment for testing it often takes not only many resources but also a very long time. Thanks to Kubernetes and its ability to create environments from scratch using just yaml files it’s just really trivial. You can create them as many as you want since they are composed mostly of logical objects to separate and distinguish them - you are only limited by the resources available on your cluster. But cluster is also quite easily expandable it’s just a matter of something that is not - money you are able to put in your project.
Easier management of applications developed by multiple teams
Most people are attracted to Kubernetes as a platform for deployments for their microservices. Although it’s also a perfect place for other services (including queue systems, databases, etc.) it brings a lot of benefits for teams who develop their applications as microservices. Often a single team is responsible for many applications and also many teams work on a system that comprises dozens of microservices. That’s where it may be handy to have a standardized way of setting up and maintain the whole CI/CD process from one place. I recommend my approach with factories which I described in my article. Especially when you have dozens of microservices and teams responsible for them it is crucial to have a common approach that is scalable and maintainable (of course using code).
Increased security of your applications and environments
With Cloud Native approch you don’t build applications - you build complete environments. To be precise you create environments from versioned code and run your service from immutable container image with all dependencies included. And when it comes to these immutable images you can now scan them for vulnerabilities after they are built but also constantly as a background process which marks them as insecure to deploy. Environments configuration can be secured with a proper process created around maintenance and governance of object definition kept as code. No unapproved or unknown change should be allowed that would compromise platform security and all services running on it.
Easier testing with databases available on-demand
Unless your applications are totally stateless and don’t need any external service then probably one of its dependencies is some kind of database. I know that’s always been a pain point in terms of testing new versions that require a new database instance and it always takes a long time to get one. Now thanks to containers we can create a new instance in a minute or so. And I’m not talking only about MySQL or PostgreSQL - did you know that you can run MS SQL Server and Oracle databases too? (although you need to talk with them about licensing since you never knows is appropriate or not). I would definitely recommend using operator frameworks such as KubeDB or other operators available at OperatorHUB.
Designing and building CI/CD pipeline
Let’s dig into more technical details now. I’m going to describe the whole process of designing and building CI/CD pipeline for an application running on Kubernetes.
Step 1 - Split CI/CD into CI and CD
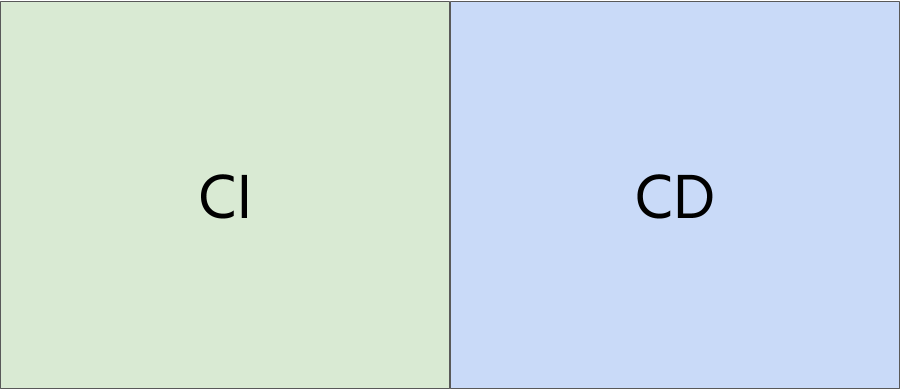
It sounds trivial but many people believe it should go together. No, it doesn’t. You should split it into two separate processes, even if you’ll put it into a single pipeline. When you join them you often tend to use the same or similar tools for both parts and you just make it too complex at times. Define clear goals of both parts:
- CI - build and test application artifacts
- CD - deploy artifacts created as a part of CI to Kubernetes environment
Tools
You definitely need some orchestrator that would be responsible for the delivery process. Here are some of the best solutions* available now:
- Jenkins - of course, it’s my favorite one, to find out why please see my article on Jenkins where I show why it’s still one of the best choices for CI/CD orchestrator)
- GitLab CI - pretty nice and very popular, not as powerful as Jenkins but easy to use with container registry built-in and it’s also a Git server
- Jenkins-X - a powerful engine for automated builds; you actually don’t create any pipelines by yourself but rather use the one generated by Jenkins-X
- Tekton - a cloud-native pipeline orchestrator that is under heavy development (it’s still in alpha); in a couple of months it should be a full-fledged CI/CD solution
* projects available on all platforms - cloud and on-premise
Step 2 - Split CI into three parts
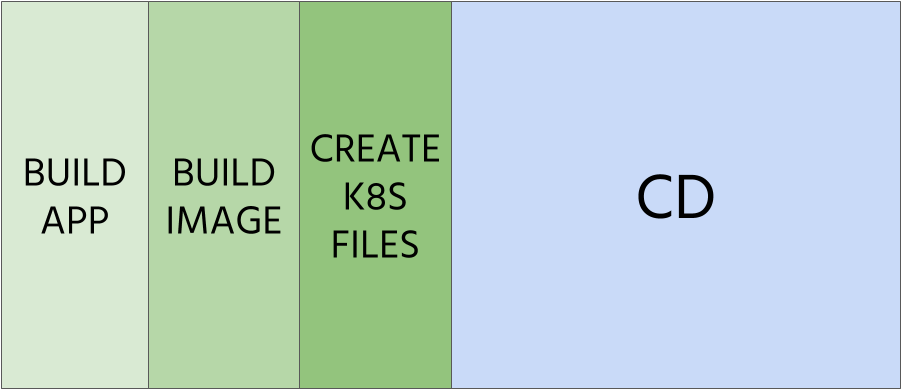
Let’s split the whole CI into three parts. We’re going to do it in order to simplify and to have more choices for tools that we’re going to use. Continuous Integration for applications running on Kubernetes distinguishes itself with one important detail - we not only provide artifacts with applications but also with its environment definition. We must also take that into consideration.
2.1 Build application artifact
GOAL: Create, test and publish (optionally) artifact with application
In this step, we need to build an artifact. For applications requiring compilation step that would produce a binary package that should be built in a pristine, fresh environment using an ephemeral container.
TOOLS
It depends on your application. The most important thing here is to leverage Kubernetes platform features to speed up and standardize the build process. I recommend using ephemeral containers for the building process to keep it consistent across all builds. These containers should have already necessary tools built-in (e.g. maven with JDK, nodejs, python etc.). I can also recommend using Source-To-Image (source mode) for small projects, especially if you’re running them on OpenShift. It brings the highest automation and standardization using images based on RHEL which is a nice feature appreciated by security teams.
EXAMPLE
Here’s an excerpt from a Jenkinsfile for my sample application written in go. It uses a Jenkins slave launched as a container in a pod on a Kubernetes cluster.
 stage('Build app') {
            agent {
                kubernetes {
                    containerTemplate {
                        name 'kubectl'
                        image 'golang:1.12-buster'
                        ttyEnabled true
                        command 'cat'
                    }
                }
            }
            steps {
                sh 'go get -d'
                sh 'make test'
                sh 'make build’
                stash name: "app", includes: "cow"
            }
        }
2.2 Build container image
GOAL: Build a container image, assign tag and publish it to a container registry
It’s pretty straightforward - we need to publish a container image with our application built in the previous step.
TOOLS
I love the simplicity and I also like Source-To-Image (binary mode) to create container images in a standardized way without defining any Dockerfiles. If you need to define them please consider using Kaniko - it can use existing Dockerfile but it’s simpler and doesn’t require any daemon running on a host as Docker does.
EXAMPLE
In my sample app, I use kaniko to build a container image without any Docker daemon running (Jenkins runs on Kubernetes and should not have a direct connection to Docker since it’s insecure). I use a custom script to test it also outside of Jenkins pipeline and because Jenkins is meant to be used as an orchestrator, not a development environment (according to its founders).
 stage('Build image') {
            agent {
                kubernetes {
                    yamlFile "ci/kaniko.yaml"
                }
            }
            steps {
                container(name: 'kaniko', shell: '/busybox/sh') {
                    unstash 'app'
                    sh '''
                    /busybox/sh ci/getversion.sh > .ci_version
                    ver=`cat .ci_version`
                    ci/build-kaniko.sh cloudowski/test1:\$ver Dockerfile.embed
                    '''
                }
            }
        }
2.3 Prepare Kubernetes manifests
GOAL: Prepare Kubernetes manifests describing the application and its environment
This step in Kubernetes specific. Building application is not only about providing binary container image but also about delivering proper manifests describing how it should be deployed (how many instances, affinity rules, what storage should be used etc.) and how its environment should be configured (what credentials to use for connecting to database, cpu reservation and limits, additional roles to be used by it etc.).
TOOLS
The simplest solution here is to use plain yaml files. Of course for bigger environments, it’s just too hard to manage and I would still recommend going with yaml files and Kustomize. Simplicity over complexity. When it comes to the latter the most commonly used software is, of course, Helm with its Charts. I don’t like it (and many others as well) mainly because of its Tiller component that makes it vulnerable and insecure. With version 3 and all these problems resolved it would be a better solution with a powerful templating system (if you really, really need it).
Step 3 - Deploy to preview environments
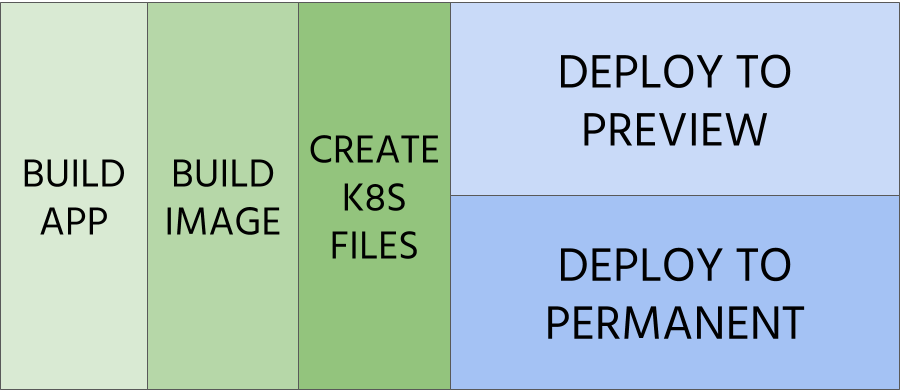
GOAL: Enable testing configuration and container image before releasing
It’s a highly coveted feature by developers - to have a dedicated and separated environment that can be used for testing. This preview environment can be created automatically (see example below) by leveraging Kubernetes manifests describing it.
TOOLS
There are no dedicated tools but I find Kustomize with its overlay feature to be perfect for it although you need a custom solution that can be integrated with your CI/CD orchestrator (i.e. triggering a deployment on certain conditions). Of course, other solutions (e.g. Helm Chart) are also viable - you just need to use namespaces and define all necessary objects there.
EXAMPLE
In my example, I’m using a dedicated container image with Kustomize binary in it and a custom script that handles all the logic. It creates a dedicated namespace and other objects kept in the same repository using Kustomize overlay with a proper name derived from a branch name.
stage('Deploy preview') {
            agent {
                kubernetes {
                    serviceAccount 'deployer'
                    containerTemplate {
                        name 'kubectl'
                        image 'cloudowski/drone-kustomize'
                        ttyEnabled true
                        command 'cat'
                    }
                }
            }
            steps {
                sh 'ci/deploy-kustomize.sh -p'
            }
            when {
                // deploy on PR automatically OR on non-master when commit starts with "shipit"
                anyOf {
                    allOf {
                        changelog '^shipit ?.+$'
                        expression {
                            ! (env.GIT_BRANCH =~ /^(master|testmaster)$/)
                        }
                    }
                    expression {
                        (env.BRANCH_NAME =~ /^PR-.*/)
                    }
                }
            }
        }
Step 4 - Prepare promotion step
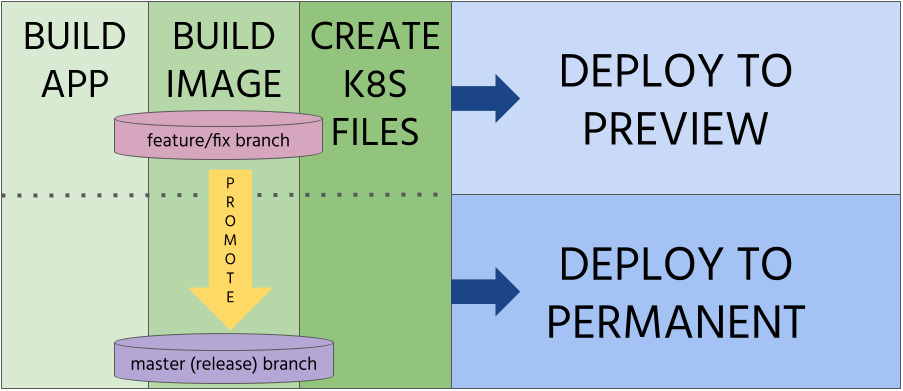
GOAL: Release artifacts and start the deployment process
After the container image is ready, all the tests pass successfully, code review acknowledges it’s proper quality, you can now promote your changes and initiate the deployment to the production environment through all required intermediate environments (e.g. test, stage).
TOOLS
Promotion could be done entirely in Git by merging development or features branches with a release branch (e.g. master).
Step 5 - Deploy to permanent environments
GOAL: Deliver applications to production through a hierarchy of test environments
It’s an important step and quite simple at the same time. We have all the necessary artifacts available and we just need to deploy them to all of the persistent environments, including production. In the example below there are only stage and prod as persistent environments and there are no tests here. However, this is a perfect place to perform some more complex tests like stress, performance and security testing.
Please note that the production environment often runs on a separate cluster but that can be easily handled by just changing a context for kubectl before applying changes on it.
TOOLS
No new tools here, just an API request or a click on the web console is required to push your new version through the rest of the pipeline.
stage('Deploy stage') {
            agent {
                kubernetes {
                    serviceAccount 'deployer'
                    containerTemplate {
                        name 'kubectl'
                        image 'cloudowski/drone-kustomize'
                        ttyEnabled true
                        command 'cat'
                    }
                }
            }
            steps {
                sh 'ci/deploy-kustomize.sh -t kcow-stage'
                // rocketSend channel: 'general', message: "Visit me @ $BUILD_URL"
            }
            when {
                allOf {
                    // changelog '^deploy ?.+$'
                    expression {
                        (env.GIT_BRANCH =~ /^(master|testmaster)$/)
                    }
                }
            }
        }


        stage('Deploy prod') {
            agent {
                kubernetes {
                    serviceAccount 'deployer'
                    containerTemplate {
                        name 'kubectl'
                        image 'cloudowski/drone-kustomize'
                        ttyEnabled true
                        command 'cat'
                    }
                }
            }

            input {
                message "Deploy to prod?"
                ok "Ship it!"
            }

            steps {
                sh 'ci/deploy-kustomize.sh -t kcow-prod'
            }
            when {
                // beforeInput true
                expression {
                    (env.GIT_BRANCH =~ /^(master|testmaster)$/)
                }
            }
        }
Conclusion
I always tell to my clients - it has never been easier to improve your environments and speed up delivery of your applications. With proper CI/CD pipeline, all of these new tools, the declarative nature of Kubernetes, we are now able to keep it under control and continuously improve it. You should leverage containers to make it repeatable, portable and also more flexible - developers will have more ways to test and experiment, security teams will have full insight into all changes being made to the system, and finally, your end-users will appreciate fewer bugs and more features introduced in your applications.


Leave a comment